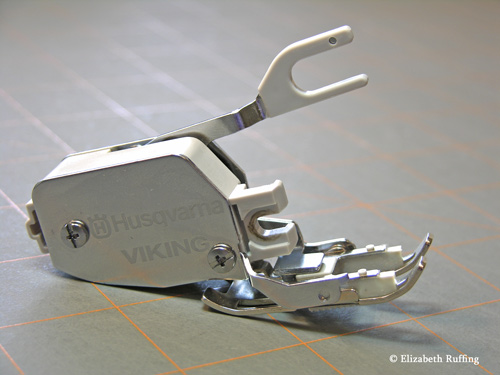
 I now have a walking foot for each of my sewing machines, my Viking Sarah, and my Kenmore 19233. Sears has a set of feet for the Kenmore that includes a walking foot, which I bought for about five dollars more than the walking foot alone cost. I thought that was a good deal. I bought my Viking walking foot on eBay, but I see it is tricky to get an authentic Viking foot online. Some people post some confusing information. Be sure to check out the part number to see that it matches the one recommended for your machine on the Husqvarna Viking site. You can find your correct one here by looking for a “dual feed foot”, under the “Quilting” accessory category. Genuine Viking walking feet say “Husqvarna Viking” on one side of the feet themselves, and the part number on the other. They are available from dealers, and online. I’ve ordered miscellaneous parts from Sewing Machines Plus before, as well as from Discount Sewing Machine Service, with good success.
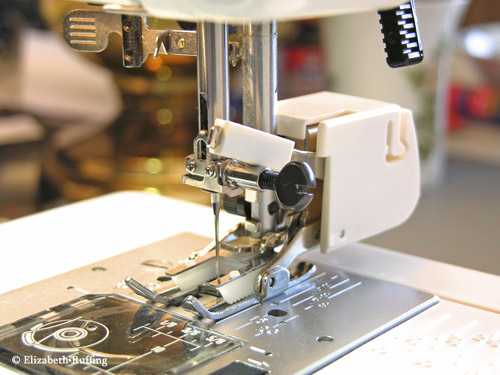
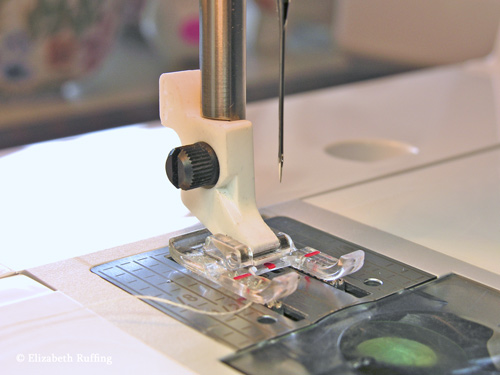 To attach a walking foot, the first thing you generally need to do is remove the presser foot ankle from your sewing machine. I’m showing this on my Viking Sarah. It’s the part that holds your presser feet. On some machines, the ankle and the foot are all one piece.
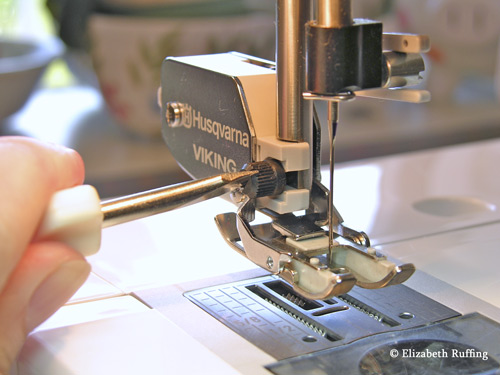
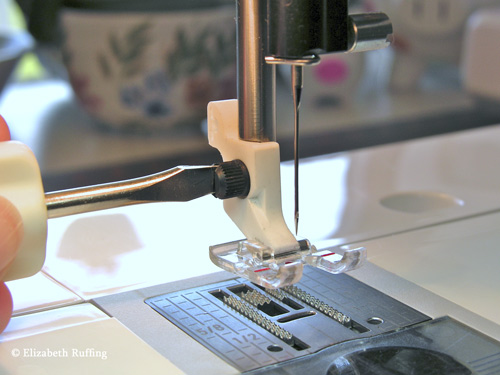 Unscrew it using the miniature screwdriver that came with your machine, and take it off. I have this larger thumb screw (shown above) on my machine, and it’s the one I used to attach my walking foot. I got a spare here, Viking Presser Foot Screw #412 40 97-01.
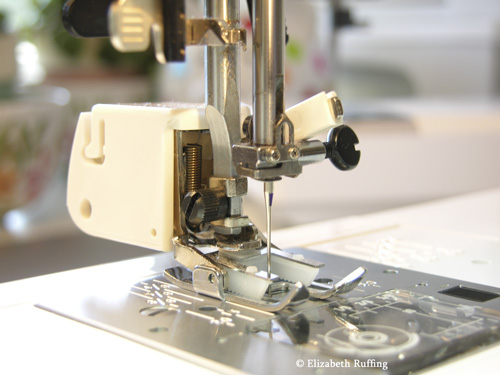
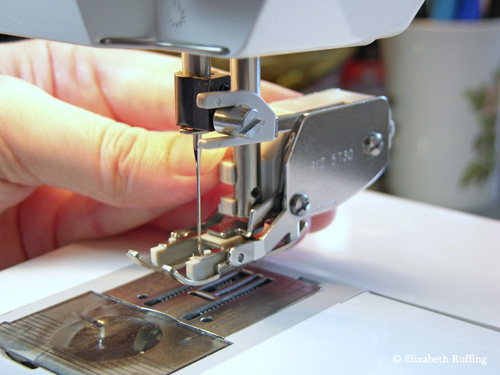 There are two things you need to line up, when attaching the walking foot itself. You may need to use your hand wheel to raise and lower your needle so you can get that forked bar over the screw that holds your needle in place. This is important because this is what makes the foot go up and down when your needle goes up and down.
 On the Kenmore, which is made by Janome (so many Janome machines will be similar), that bar on the walking foot rests on top of the bar that holds the screw for the needle (shown above). Either way, the bar goes over the part that holds the needle in place, the one that sticks out.
 On the other side of the foot, is the part that accepts the same thumb screw that held your presser foot ankle in place. Attach it the same way the ankle was attached. There is a hole right in the metal bar. All you need to do is line it up where the indentation for it is, and make sure it fits snuggly in place. Tighten up the screw and you are ready to sew.
 Again, it looks a little different on the Kenmore (shown above), but the idea is the same. One side attaches like a presser foot ankle, and the other part rests over the needle screw. You might need to wiggle it a little to get it to pop into place, but once it is secure in its proper place, it doesn’t jiggle around. With some walking feet, there is also a hole, in the back of the walking foot, that accepts a metal guide bar. You can just slip the guide bar in the hole, if and when you want to use it, and slide it out to the correct distance from the needle that you want to use. You line the edge of guide bar up with your last row of stitching, as you sew, to keep an even distance.
Now you can sew through layers without so much shifting of one fabric over another. It helps too when you don’t have a presser foot pressure adjustment option, which some machines don’t have. I’ve noticed some newer machines come with built-in walking feet. I decided to try mine out for regular sewing too, and I’ve been having good results.


Thank you so very much for posting this!!! I looked up a few other instructional sites and was totally lost. I appreciate your use of pictures and descriptions of the parts, since I don’t know what most of the parts are called!
I agree with Shannon. Thank-you for the excellent one-of-a-kind instructions!
You’re both welcome! Glad it was helpful.
Thanks!! Really needed this today!
Thanks! I had forgotten how and had no instructions. Perfect.
Yes…..thank you, thank you!!!!!
[…] Art and Toy Studio Skip to content HomeWelcomeAbout MeMy ArtShopContact Me « How to attach a walking foot to your sewing machine Halloween musings » October 22, 2010Bits and pieces By Elizabeth […]
Thanks so much – even though the walking foot came with my Kenmore there were no instructions in the manual.
Thank you for posting this. The walking foot directions I had were lacking and I was ready to drag my machine to the sewing store!
Perfect! Thank you. The instructions I had were way too complicated. This was great.
Thanks for this. My walking foot came today with absolutely no instructions on how to attach or use it. Can’t wait to try it.
Can someone share with me what the settings are suppose to be on the Kenmore Model 385.19110? My problem, with both the walking foot and my quarter inch foot is that the needle has a tendency to hit on the back side of the open area of the foot and obviously break. Though not always perfect luck, the best I can sometimes get is having the stitch design on 1, the width on 2.5 and the length on 2.2.
Hi Sally,
It sounds to me like you may need to have a technician adjust your needle position to get it exactly centered and where it should be. It should be an easy adjustment, and you can go to anyone who works on Kenmore or Janome sewing machines. I would also double check to make sure that you have the correct feet for your model. There is usually a list with the part numbers in the manual. There are different feet for different models, and it is possible you have ones that aren’t the correct ones for your machine. I hope that helps!
Take care,
Elizabeth
Thank you so much, Elizabeth, for such clear instructions. I’ve been searching for some time so that I could proceed with a project. I didn’t want to just “have a go” in case I damaged something. I can’t wait to get started. Kind regards, Janet
Thank you for this! I have had a walking foot for years and didn’t know how to attach it properly. I thought it didn’t work until I read this! Now that I know how to attach it properly it’s working like a dream.
Why weren’t there any instructions with the foot! Go figure.
Thank You for these instructions. Great pictures helped a lot!
Thank you for these clear, easy to understand instructions!!!!!!
Thank you for the clear and succinct information. I had ordered the walking foot and was going to send it back because it wasn’t working. Decided to take it out and try again. The instructions that came with it were incorrect. Appreciate it so much. Got the most beautiful straight lines on my quilting sample.
Happy to have found these nice instructions, as I had forgotten how.
Thank you so very much for posting this