Posted on 1 Comment

Emily, handmade original one-of-a-kind folk art doll by Elizabeth Ruffing

Emily handmade original one-of-a-kind art doll by Elizabeth Ruffing, Ruffing's
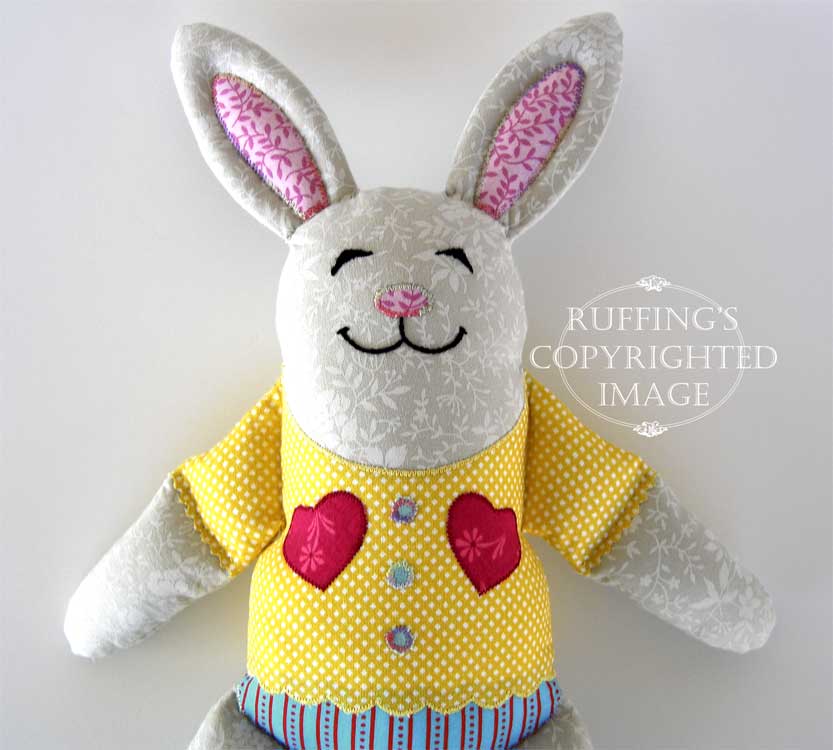
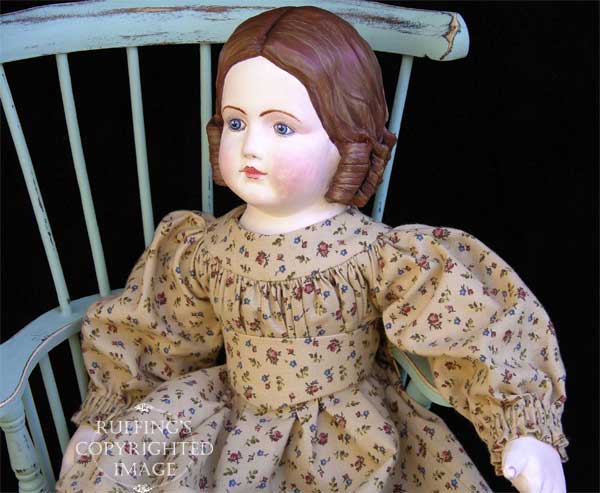
This is my one-of-a-kind original folk art doll, Emily, named after the famous poet Emily Dickinson.

Emily handmade original one-of-a-kind art doll by Elizabeth Ruffing, Ruffing's
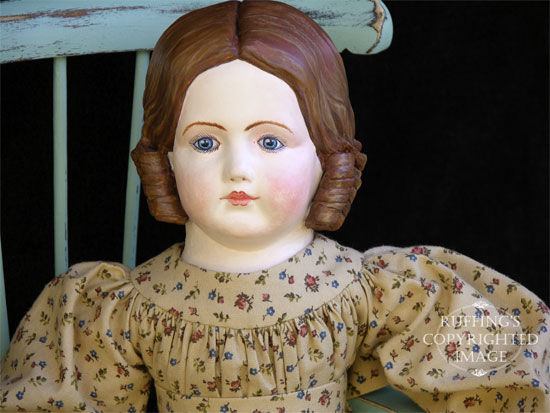
Emily was inspired by the charming Izannah Walker dolls of the 1800’s.

Emily handmade original one-of-a-kind art doll by Elizabeth Ruffing, Ruffing'sI designed both her body pattern and her dress pattern myself, and then carefully sewed each in 100% cotton fabric.

Emily handmade original one-of-a-kind art doll by Elizabeth Ruffing, Ruffing's
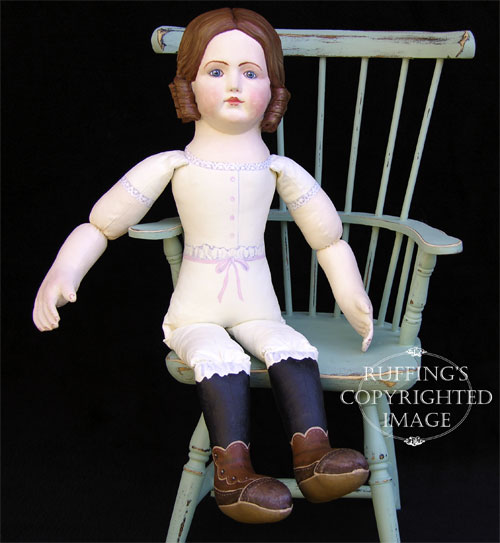
Emily’s fingers are hand quilted and lightly wired to give them a gentle curl, and her arms bend slightly at the elbows.

Emily handmade original one-of-a-kind art doll by Elizabeth Ruffing, Ruffing'sHer arms bend at her shoulders, and her legs bend at her hips and knees. Emily’s bottom is weighted with Poly-Pellets so she can sit nicely. (Chair not included.)

Emily handmade original one-of-a-kind art doll by Elizabeth Ruffing, Ruffing's
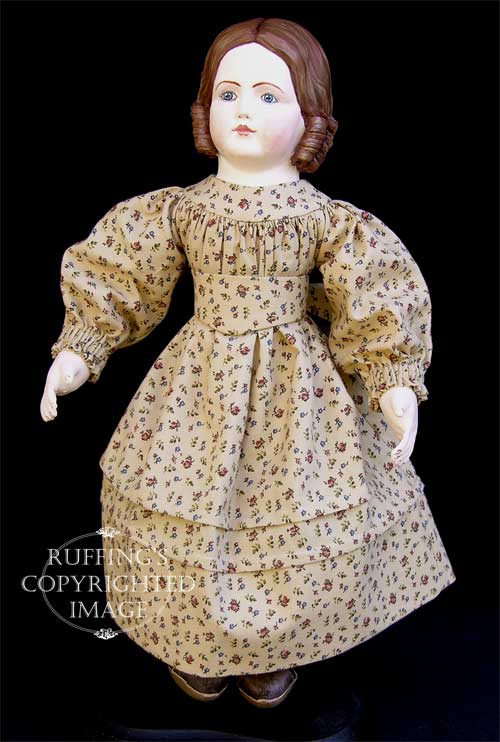
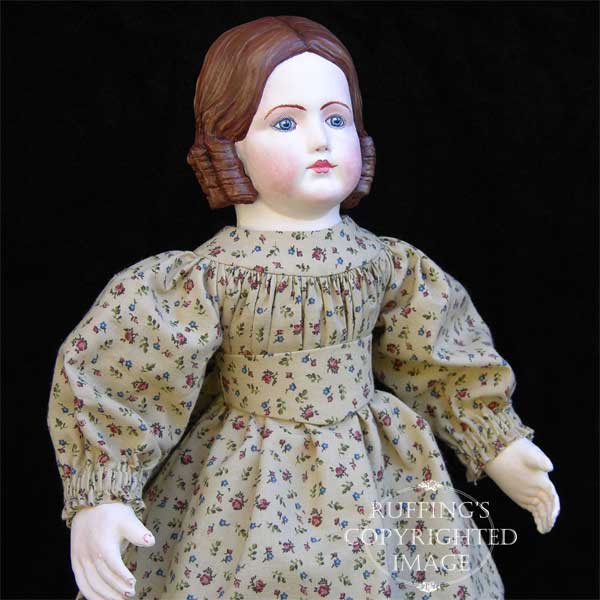
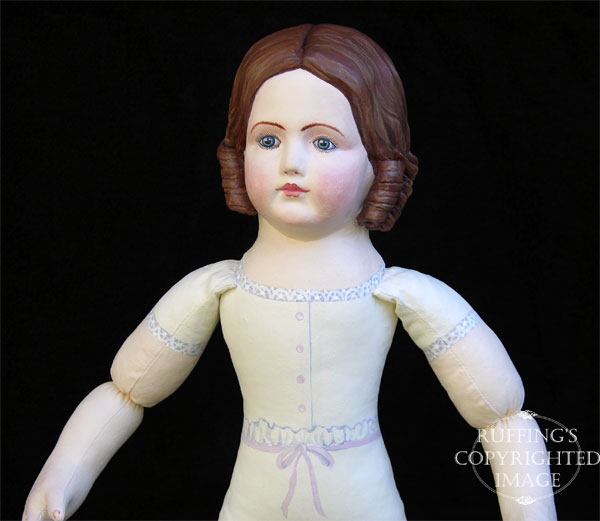
I made Emily’s antique reproduction Jumeau face using papier mâché.

Emily handmade original one-of-a-kind art doll by Elizabeth Ruffing, Ruffing's
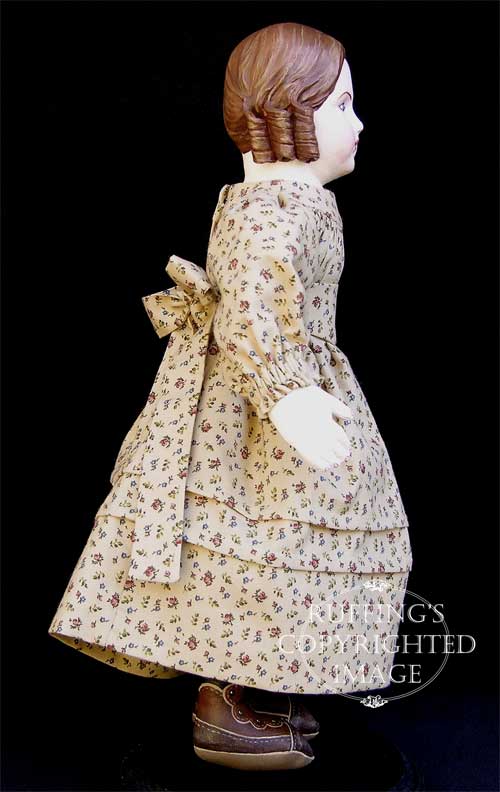
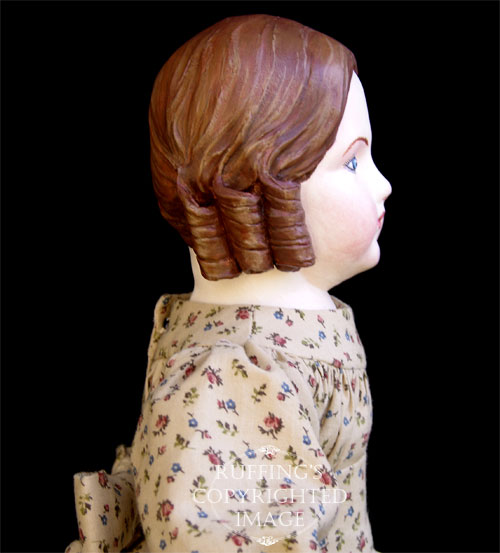
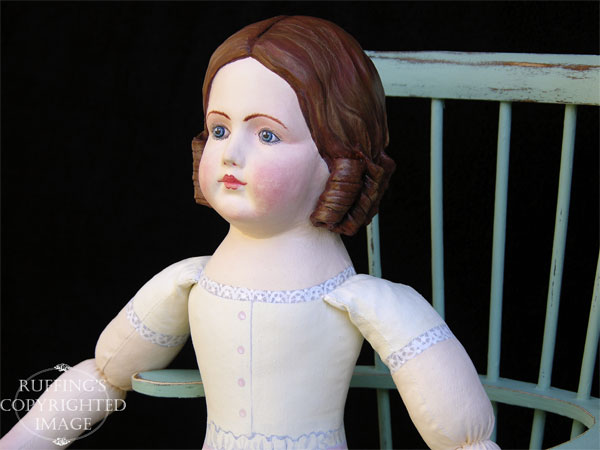
Her hand-sculpted ringlets on either side of her head are hand sculpted from paperclay.

Emily handmade original one-of-a-kind art doll by Elizabeth Ruffing, Ruffing's
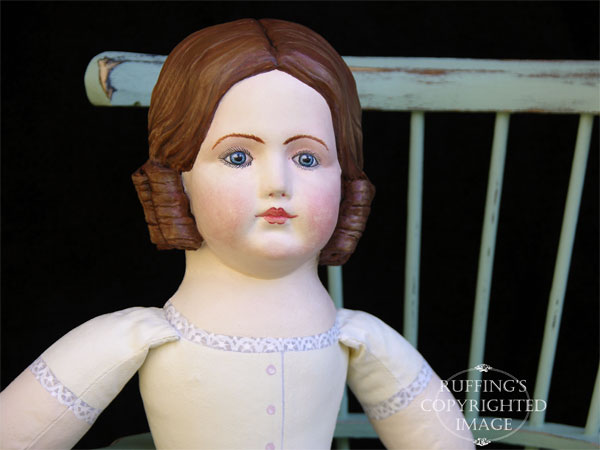
Emily was painted with gesso, and then detailed with acrylic paint. Her blue eyes are hand painted.

Emily handmade original one-of-a-kind art doll by Elizabeth Ruffing, Ruffing's
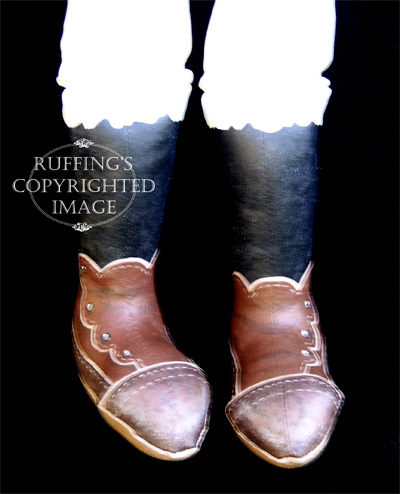
Her shoes are painted on as well, with tiny buttons up their sides.

Emily handmade original one-of-a-kind art doll by Elizabeth Ruffing, Ruffing's
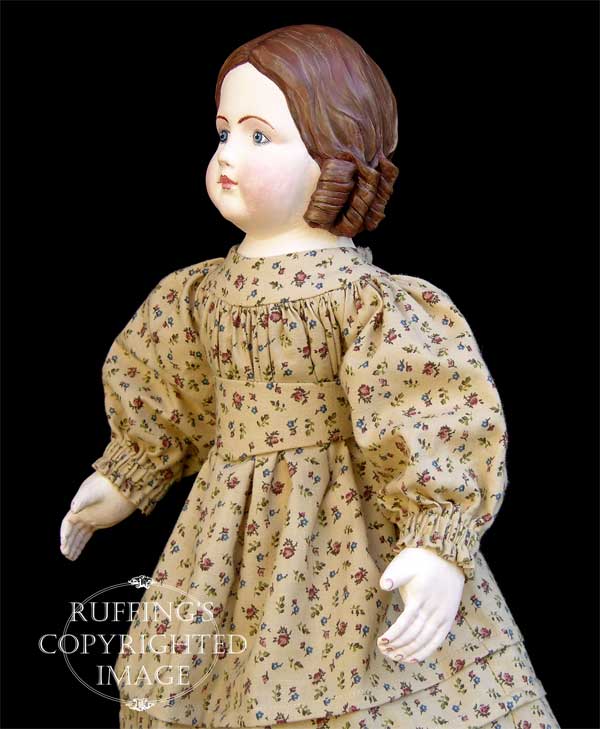
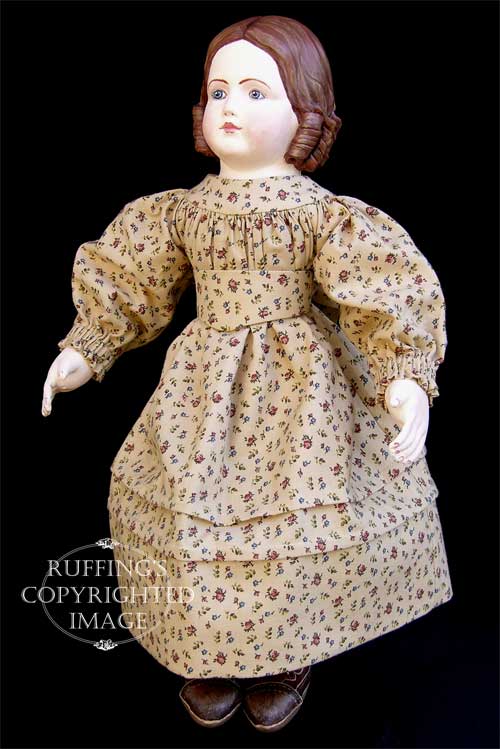
I made Emily’s dress from a tan calico quilter’s cotton. It is dotted with little burgundy and navy blue flowers.

Emily handmade original one-of-a-kind art doll by Elizabeth Ruffing, Ruffing's
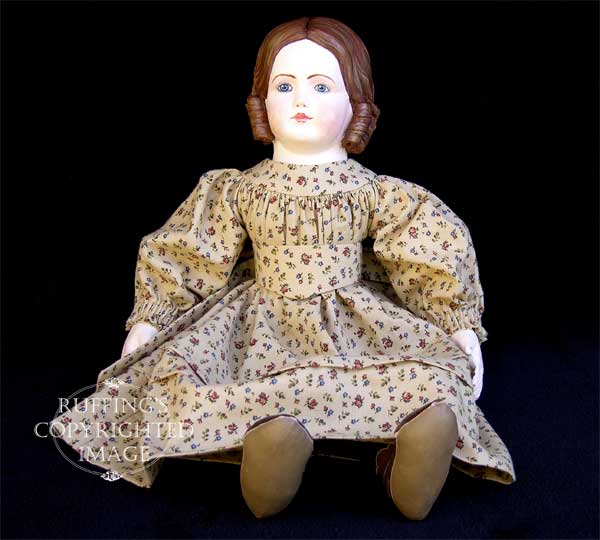
Emily’s sash dips to a “V” shape in the front, and it holds in all the fabric gathers at her yoke. Her sash ties in the back to make a pretty bow.

Emily handmade original one-of-a-kind art doll by Elizabeth Ruffing, Ruffing's
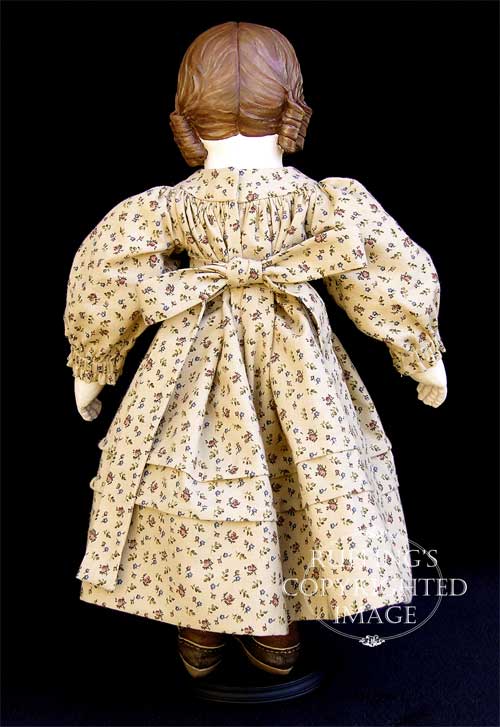
I sewed two pin tucks at the bottom of her dress and added a big three inch hem to make the skirt stand out nicely. All the seams are carefully finished.

Emily handmade original one-of-a-kind art doll by Elizabeth Ruffing, Ruffing'sHer antique-style undergarments are carefully detailed with painted-on lace, pink buttons and a bow.

Emily handmade original one-of-a-kind art doll by Elizabeth Ruffing, Ruffing'sEmily is approximately 15 inches tall. She is sealed with matte varnish for protection.

Emily handmade original one-of-a-kind art doll by Elizabeth Ruffing, Ruffing'sMany hours went into making Emily. She is a one-of-a-kind work of art. Emily is meant for display only.

Emily is signed and dated. She comes with a hang tag, a certificate of authenticity, and a copy of her story.

Update: Emily has been adopted. Thank you!

Posted on

Stitch-along, Bluebird Quilt Block Part 2, Blanket Stitch

Okay, I’m back…We are about to start embellishing the bluebird quilt block with hand embroidery stitches. If you would prefer to use machine stitching, a zig zag or satin stitch along the raw edges of the appliqué will work fine, or you can try out the decorative stitches that might have come with your machine. I’m going to start with a hand-embroidered blanket stitch. Here are the basics of the blanket stitch before we start on the block itself. The first stitch is made by poking your needle through from the back of the fabric to the front of the fabric, along the raw edge you want to finish (shown here with a purple line).

The second stitch is made by taking a stitch from the front to the back of the fabric, just to the side of your first stitch, but inside the raw edge you want to finish. In one movement, poke the needle back out to the front of the fabric, along your raw edge, just next to the first stitch, while holding the embroidery floss from your first stitch down so your needle will be on top of the loop of embroidery floss from the last stitch. (You can click on my pictures to make them larger, for anyone who might not know that already.)

Pull your embroidery floss taut, not too tight to make the fabric pucker, but just enough that the stitch is smooth. It helps to smooth it with your finger as you go. These are the essential steps. You will just keep repeating them along your raw edge.

Poke your needle in and out of your fabric again, coming our on top of the last loop of floss. Keep your stitches an even distance apart. When stitching around a circle, point your needle from the middle centerpoint of the circle outward to make the stitches fan out nicely.

Pull them taut as you go.

Repeat the same stitch.

Pull it taut, and continue all the way around. You will take one little stitch almost in place to lock it down when you reach your starting point again. Then you will carry your floss along the wrong side (back) of the fabric to the next raw edge you want to finish, or you will take a backstitch on the back of the fabric and cut the floss to end it. I make a little knot just to be safe. Since this block will be quilted and it will have batting behind of it, it doesn’t need to lie perfectly flat.

Okay…onto the bluebird block. Once again, you will need a few things:

  • A hoop (I used a 9 inch wooden embroidery hoop, but you may need a smaller one if your square is smaller than mine, which was 11 1/2 inches)
  • Embroidery floss (I used DMC 3777, but you will match your floss to the red of your berries)
  • An embroidery needle (I think I used a size 10)

Put your quilt block in your hoop, keeping the fabric taut, and tighten the screw on the side of the hoop to make it snug. Cut a length of embroidery floss about 20 inches long and separate out two strands of floss from the rest. Thread your needle with the two strands. A needle threader helps, but I just wet the ends with my tongue and cut them at a slant to make threading easier.

Pick a berry and start your blanket stitch as described above. Take a little lock stitch almost in place as you reach your starting point and carry the floss along the back of your fabric to the next berry. Repeat the process, ending and starting a new thread as you run out. I tried to work in clusters so I didn’t have to make my floss travel too far across the back. I used the blanket stitch on all the red berries.

My fabric appliqués lifted for the wear, and so I steam pressed them down again when I was done, following the manufacturer’s instructions for my paper-backed fusible.

Here’s a closeup of my blanket stitch. I found I got a little better at it as I went along. It would probably be possible to use this stitch on most of the raw edges, if you wanted to, but I think I will experiment with another stitch for the next area I do. More later…

Posted on

Bunny Treasury on Etsy, "Hop in! Bunnies Helping Bunnies"

Special thanks to Michele from Etsy for Animals for adding Max Bailey’s and A E Ruffing’s prints to her “Hop in! Bunnies Helping Bunnies 2” treasury list on Etsy! Many of the the Etsy for Animals members are helping out the Buckeye House Rabbit Society this month with donations based on their sales from their Etsy shops.

Our prints that are featured above are “Hiding”, a little cottontail rabbit with Black-eyed Susans, by A E Ruffing,

and “Proud Mom”, a Victorian mama bunny with a carriage-full of baby bunnies by Max Bailey. Both are available in our Etsy shop. 10% of sales (less shipping) of prints purchased from our Etsy shop will be donated to animal charities.

Michele also added my “Yorkie Puppy” to her “Baby Animals Say Happy New Year!” treasury list on Etsy, which features items for sale from Etsy for Animals members. This print is also available in our Etsy shop.

Posted on 1 Comment

Huggy Bunny, Original Doll by Elizabeth Ruffing

Huggy Bunny by Elizabeth RuffingThis is my new “Huggy Bunny”. He is an original one-of-a-kind doll, created from my own original design and pattern. He is hand signed on his bottom. Huggy Bunny is entirely handmade and is meant to be displayed and loved, and he is sturdy enough to be played with. His body is made of 100% cotton quilting fabrics, which have been fused to an extra layer of cotton sheeting for durability.

Huggy Bunny by Elizabeth RuffingHis little tail, and the edges of his clothes, and his pink parts are machine stitched with a zig zag over the raw edge appliqué. His ears and joints have been hand quilted. He has no loose or removable parts. He is stuffed with Poly-fil polyester stuffing.

I hand embroidered a coral stitch on his booties. His cute little eyes and mouth are hand embroidered as well.

Huggy Bunny by Elizabeth RuffingHuggy Bunny has love to give. Lots. And he’s happy to give it. He is a cheerful and agreeable sort.

Huggy Bunny is also part of the Etsy for Animals January challenge. 10% of sales (not including shipping) of prints from my Etsy shop and our collective Etsy shop will be going to animal charities. This month we are hoping to raise some money for The Cedarhill Animal Sanctuary in light of their recent emergency need for donations.

Huggy Bunny and The Rabbit Dances by Elizabeth Ruffing

Michele from Etsy for Animals added Huggy Bunny to her “Bunnies Helping Bunnies! EFA” treasury list on Etsy, along with my “The Rabbit Dances” greeting cards. Michele also posted Mr Bunny on the Best Friends Network forums, which is part of Best Friends Animal Society, a group that advocates kindness to animals and an end to pet homelessness. Thanks, Michele!

Please see Elizabeth’s Etsy toy shop for currently available soft dolls and art toys.